Getting Started with Wave Flow
This guide walks you through setting up Wave Flow to protect your critical services with priority-based traffic control. You'll learn how to create your first traffic rule policy, deploy it to your proxy infrastructure, and verify it's working.
Note: This guide uses Istio as the example proxy, but Wave Flow works with any Proxy-WASM compatible service mesh or API gateway (Linkerd, Kuma, Consul, Kong, NGINX, Envoy Gateway, APISIX). The concepts and UI steps are identical across all proxies — only the verification commands differ.
Prerequisites
Before you begin, ensure you have:
Required Infrastructure
- Proxy or Service Mesh: One of the following with Proxy-WASM support:
- Istio 1.14+ (Ingress Gateway, Sidecar, or Ambient Mesh)
- Envoy Gateway, Kong Gateway, NGINX Ingress, APISIX
- Linkerd, Kuma, or Consul (service meshes)
- Wave Agent: Installed and connected to your cluster
- Kubernetes Access:
kubectlaccess with permissions to view deployments - Wave Console Access: Access to the Wave web console
Step 1: Understanding Your Traffic Patterns
Before configuring Wave Flow, identify which traffic types are most critical to your business:
Questions to Consider:
- Which endpoints generate revenue? (e.g.,
/checkout,/payment,/order) - Which users are most valuable? (e.g., premium subscribers, enterprise customers)
- Which operations are read-only vs. write? (e.g., GET vs. POST requests)
- Which services are downstream dependencies? (e.g., authentication, database writes)
Example Priority Mapping:
| Traffic Type | Business Impact | Suggested Priority Class |
|---|---|---|
| Checkout API | Direct revenue loss | CRITICAL |
| User authentication | Blocks all features | CRITICAL |
| Payment processing | Direct revenue loss | CRITICAL |
| User dashboard | High user impact | IMPORTANT |
| Product browsing | Medium user impact | MODERATE |
| Search suggestions | Low user impact | BULK |
| Recommendations | Nice-to-have | BULK |
Step 2: Create Your First Traffic Rule Policy
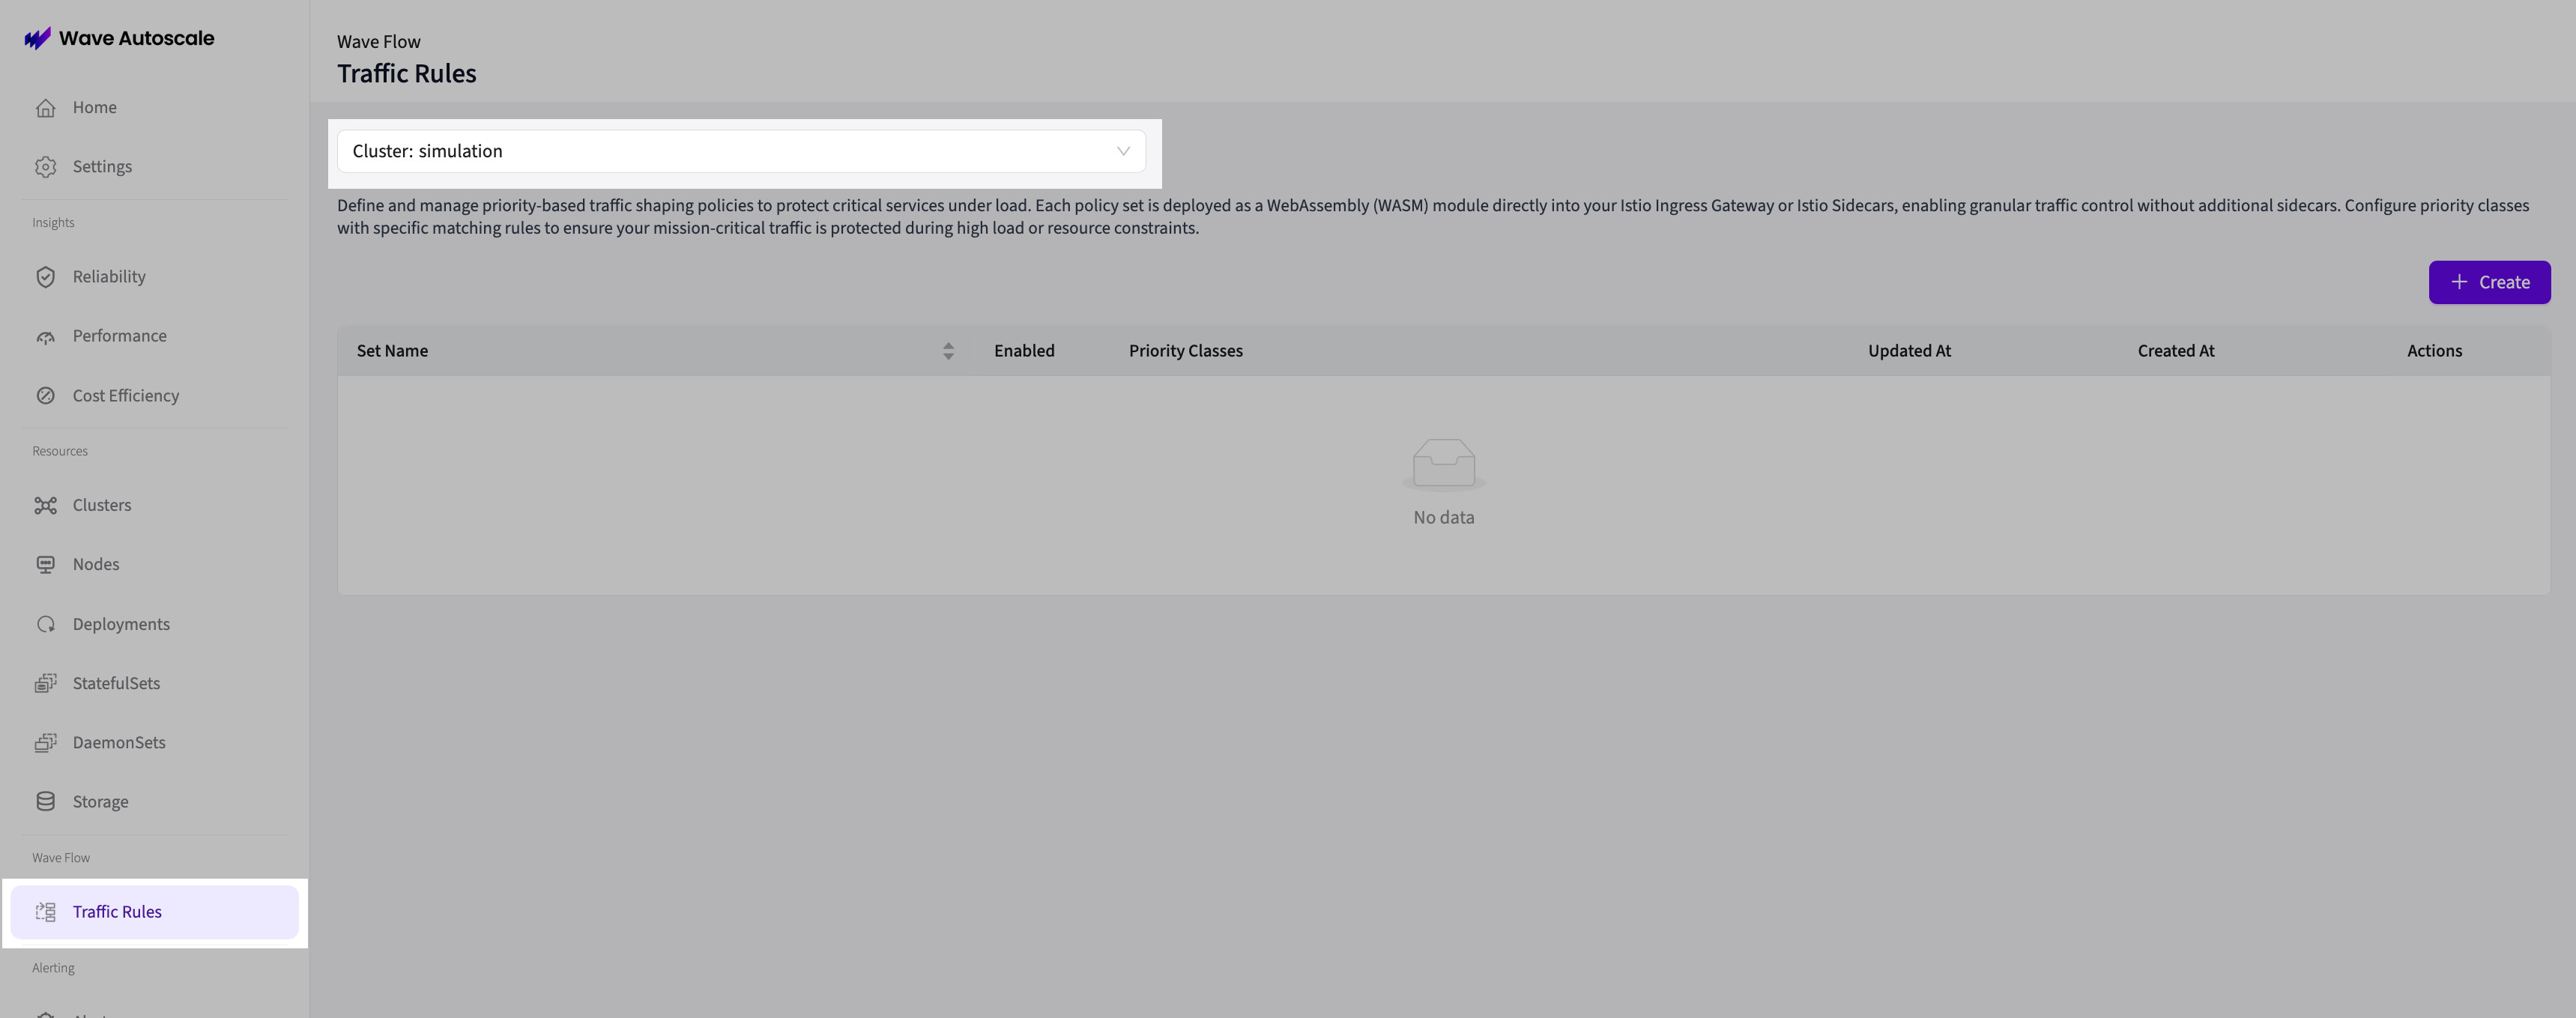
Access Traffic Rules Page
- Log in to the Wave web console
- Navigate to Traffic Rules in the left sidebar
- Select your target cluster from the dropdown
Create a New Policy Set
- Click the "Create" button in the top-right corner
- The policy creation drawer will open

Configure Basic Settings
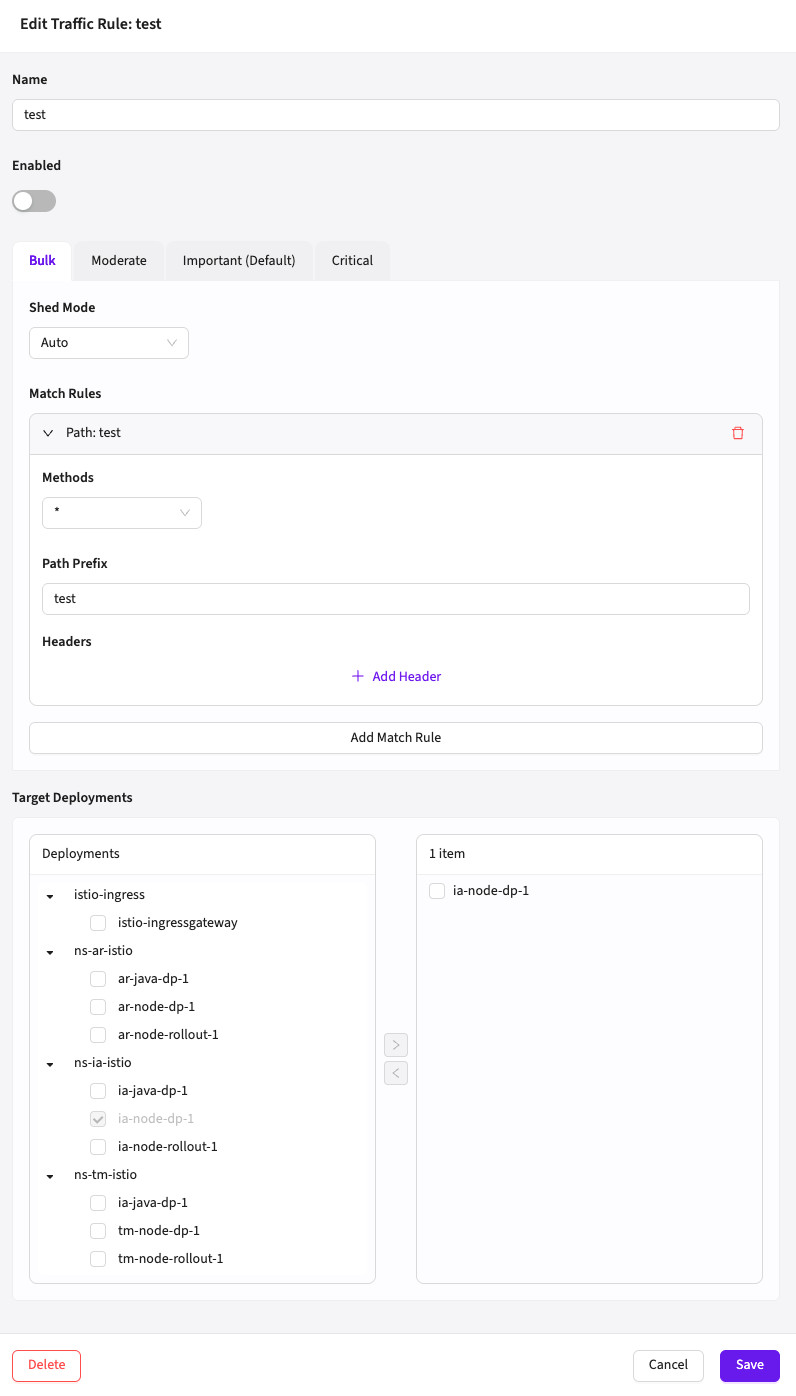
Policy Set Name: Give your policy a descriptive name (e.g., production-api-priority)
Example:
Name: production-api-priorityConfigure Priority Classes
Each policy set includes four priority classes. For each class, configure:
Shedding Strategy:
- Disabled: Never shed this priority class (always allowed)
- Auto: Shed automatically when system is under load
- Force: Always shed this traffic (useful for testing or emergency traffic blocking)
Match Rules (define which requests belong to this class):
- HTTP Headers: Match based on request headers
- URL Paths: Match based on URL path prefixes
- HTTP Methods: Match based on HTTP method (GET, POST, etc.)
Example Configuration:
CRITICAL - Never Shed
Shedding Strategy: Disabled
Match Rules:
- Paths:
/checkout/*(checkout flow)/payment/*(payment processing)/api/v1/auth/*(authentication)
- Methods:
POST,PUT,DELETE(write operations)
Purpose: Protect revenue-generating and critical write operations
Select Target Deployments
Choose which proxies should apply this policy:
Target Type:
- Ingress Gateway (recommended): Applies to all traffic entering the cluster (Istio, Kong, NGINX, Envoy Gateway, etc.)
- Sidecar: Applies to specific service sidecars (Istio, Linkerd, Kuma, Consul)
- Ambient Waypoint: Applies to Istio ambient mesh waypoint proxies (Istio-only feature)
Select Targets:
- Expand the cluster tree to see available targets
- Check the checkbox next to your ingress gateway or target proxies
- The policy will be deployed as a WASM module to the selected targets
Ingress Gateway vs. Sidecar
For most use cases, applying the policy to your Ingress Gateway is recommended:
- Single point of control for all external traffic
- Easier to manage (one policy covers entire cluster)
- Lower resource usage (one WASM module instead of many)
Use Sidecar targets when:
- Different services need different priority rules
- You want service-level control independent of ingress
Enable and Save
- Toggle "Enabled" to
Yes(or leave disabled for testing) - Click "Save" to deploy the policy
The policy will be deployed as a WASM module to the selected targets within seconds.
Step 3: Verify Deployment
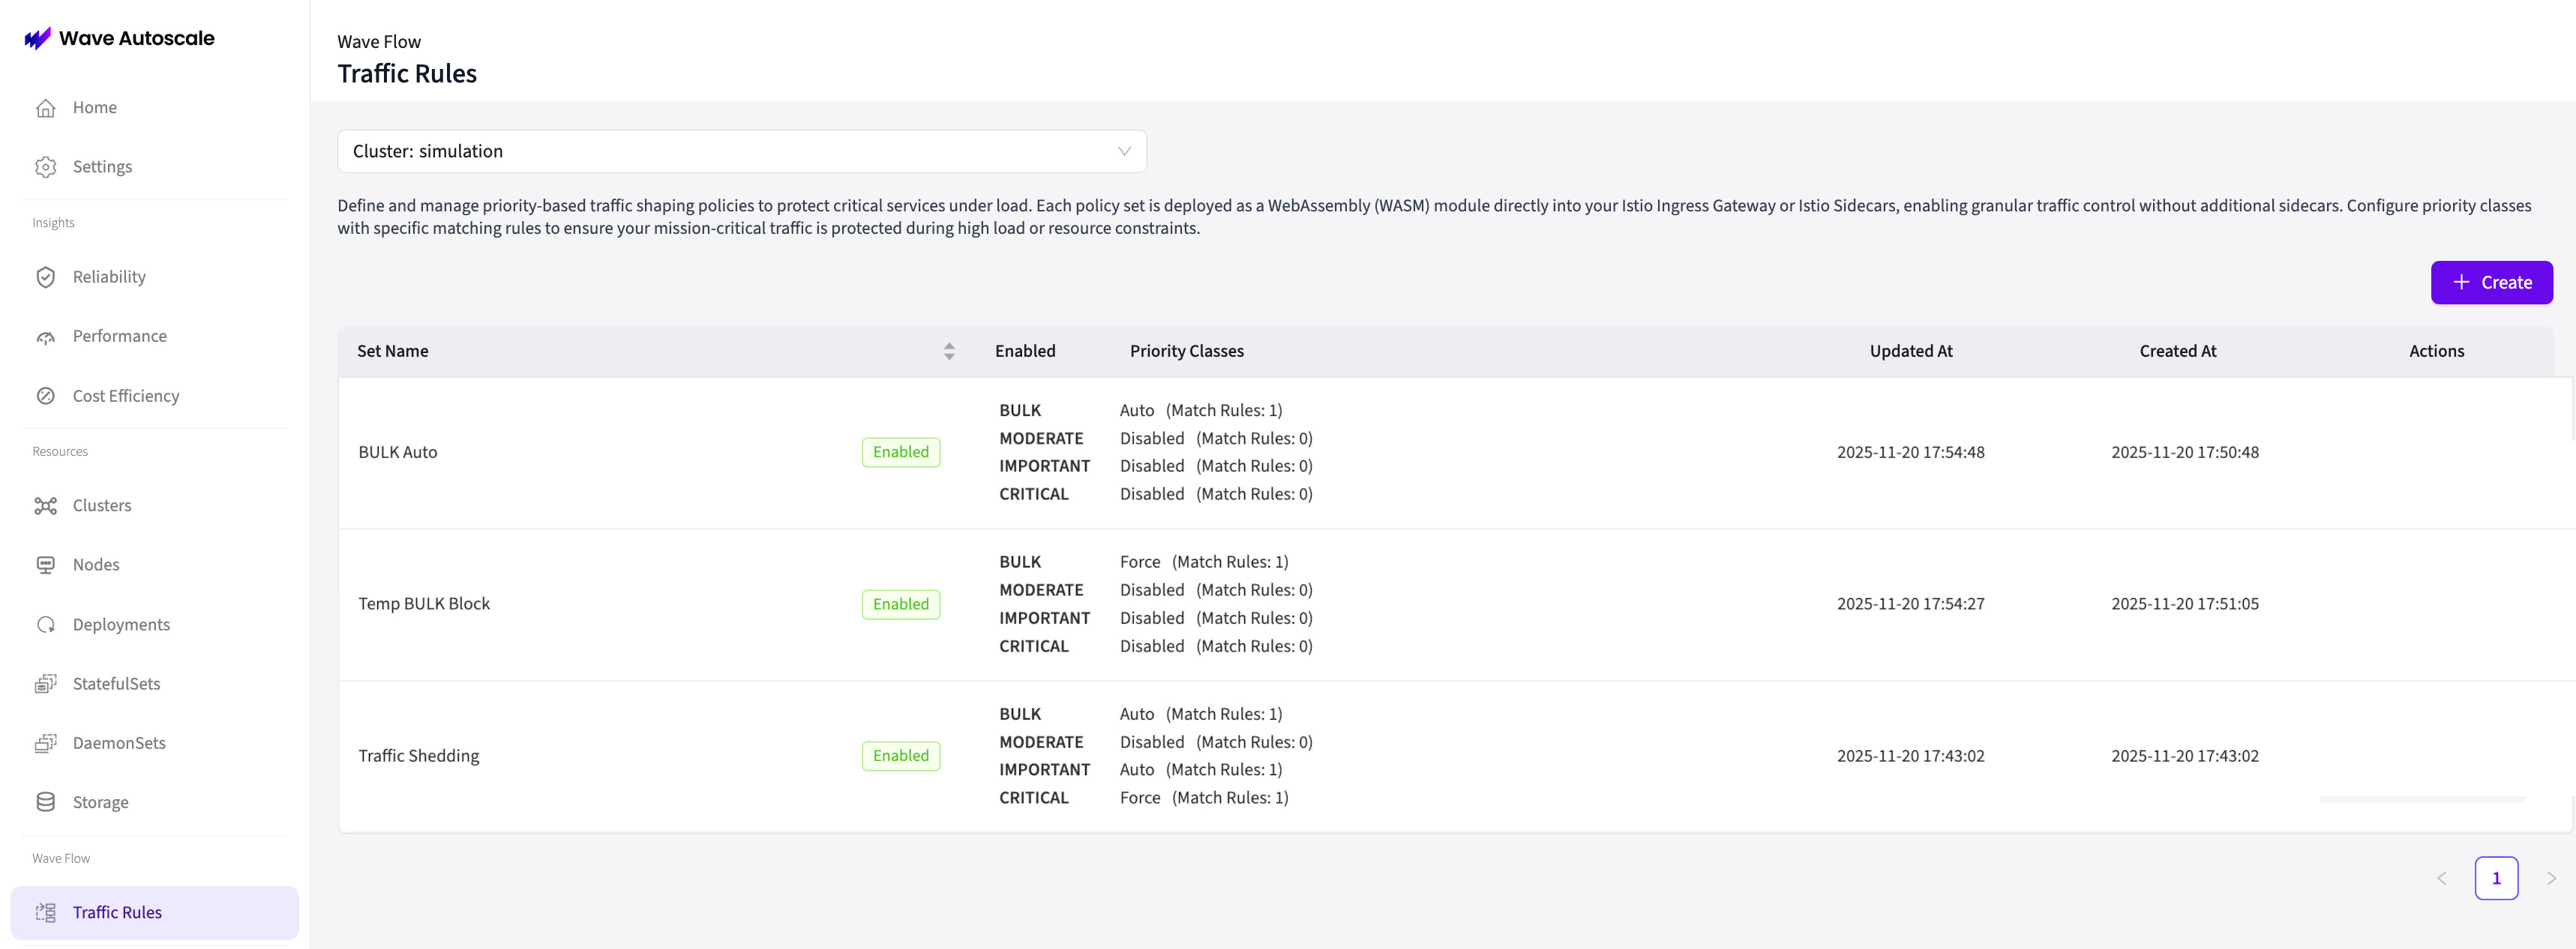
After saving, verify the policy is active:
Check Wave Console
- Return to the Traffic Rules page
- You should see your newly created policy in the table
- Enabled column should show a green "Yes" badge
Step 4: Monitor Traffic and Shedding
View Real-Time Logs
To access the logs/details page for your policy:
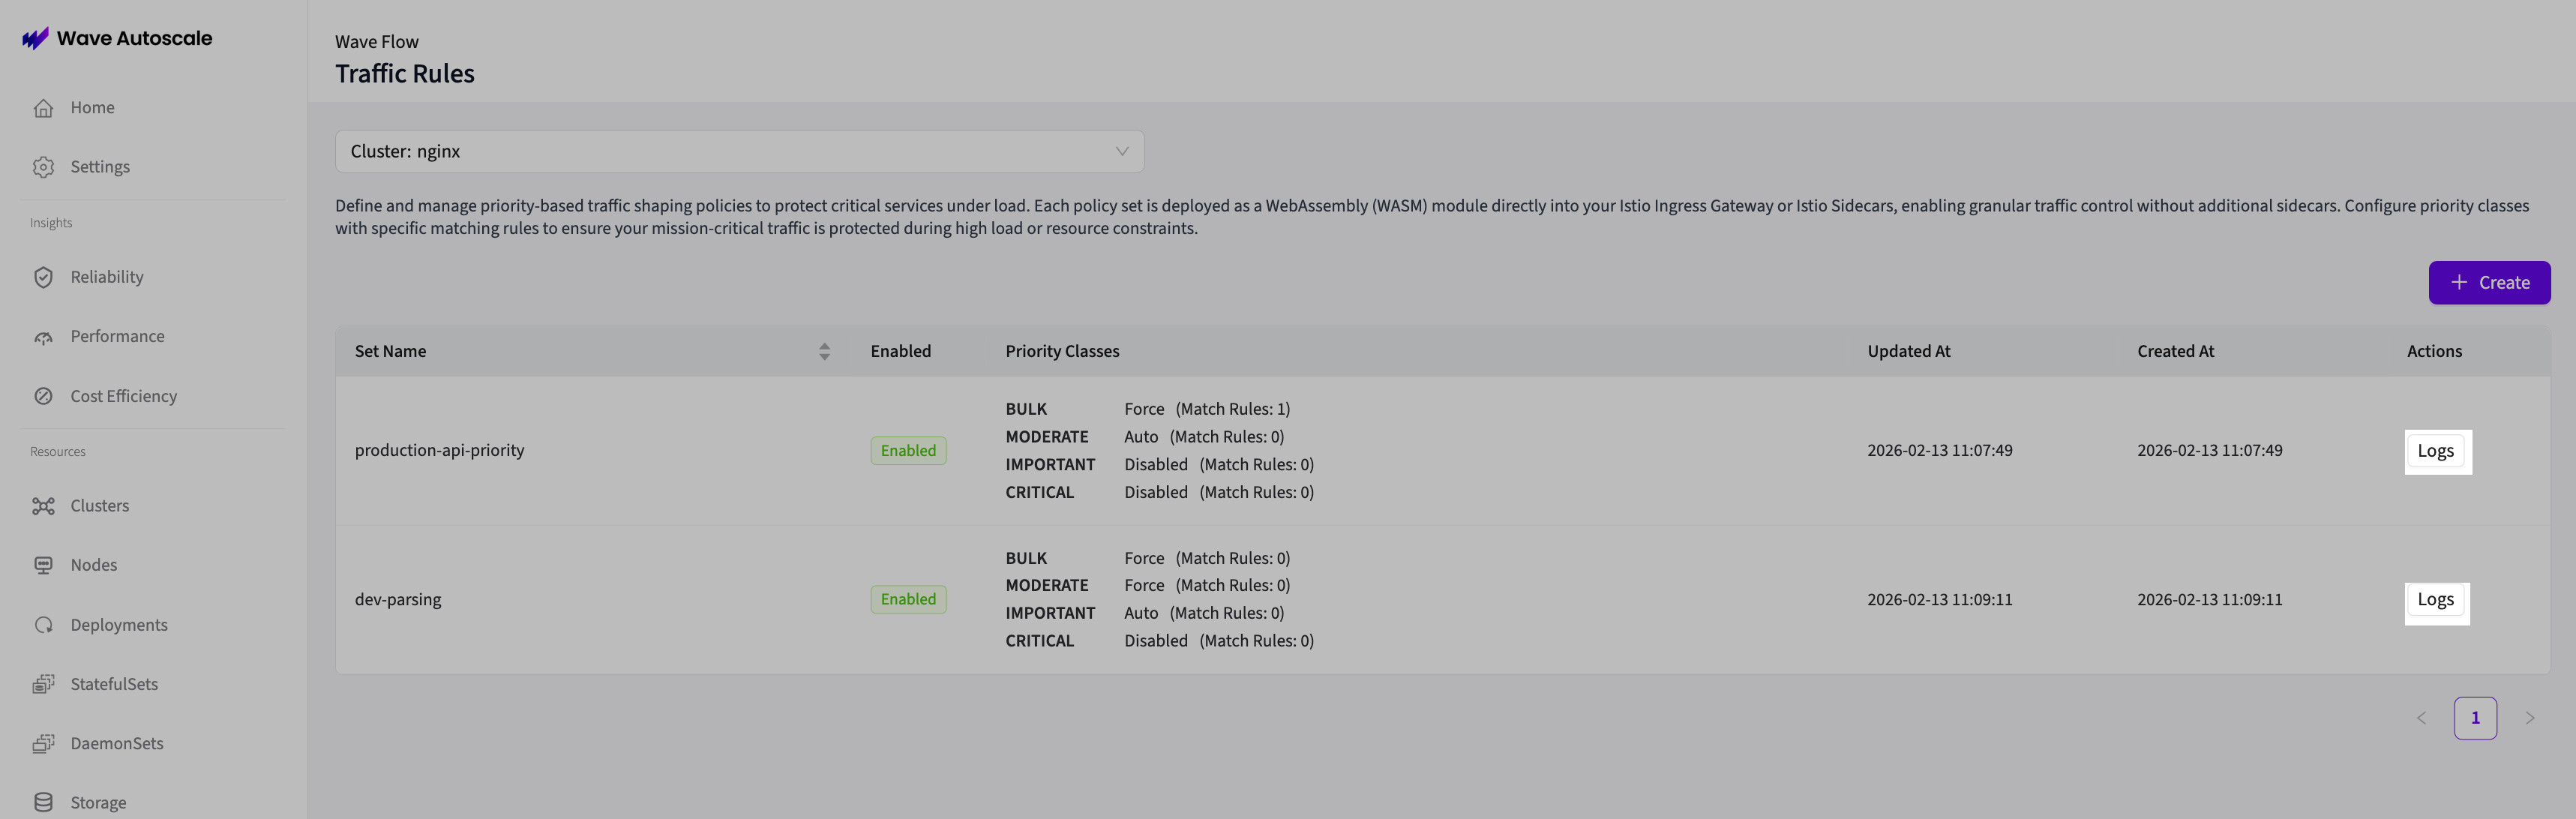
- In the Traffic Rules table, click the "Logs" button in the Actions column for your policy
You'll see a details page showing:
- Total requests per priority class
- Shedding decisions (allowed vs. rejected)
- Timestamp of each classification
- Policy configuration details
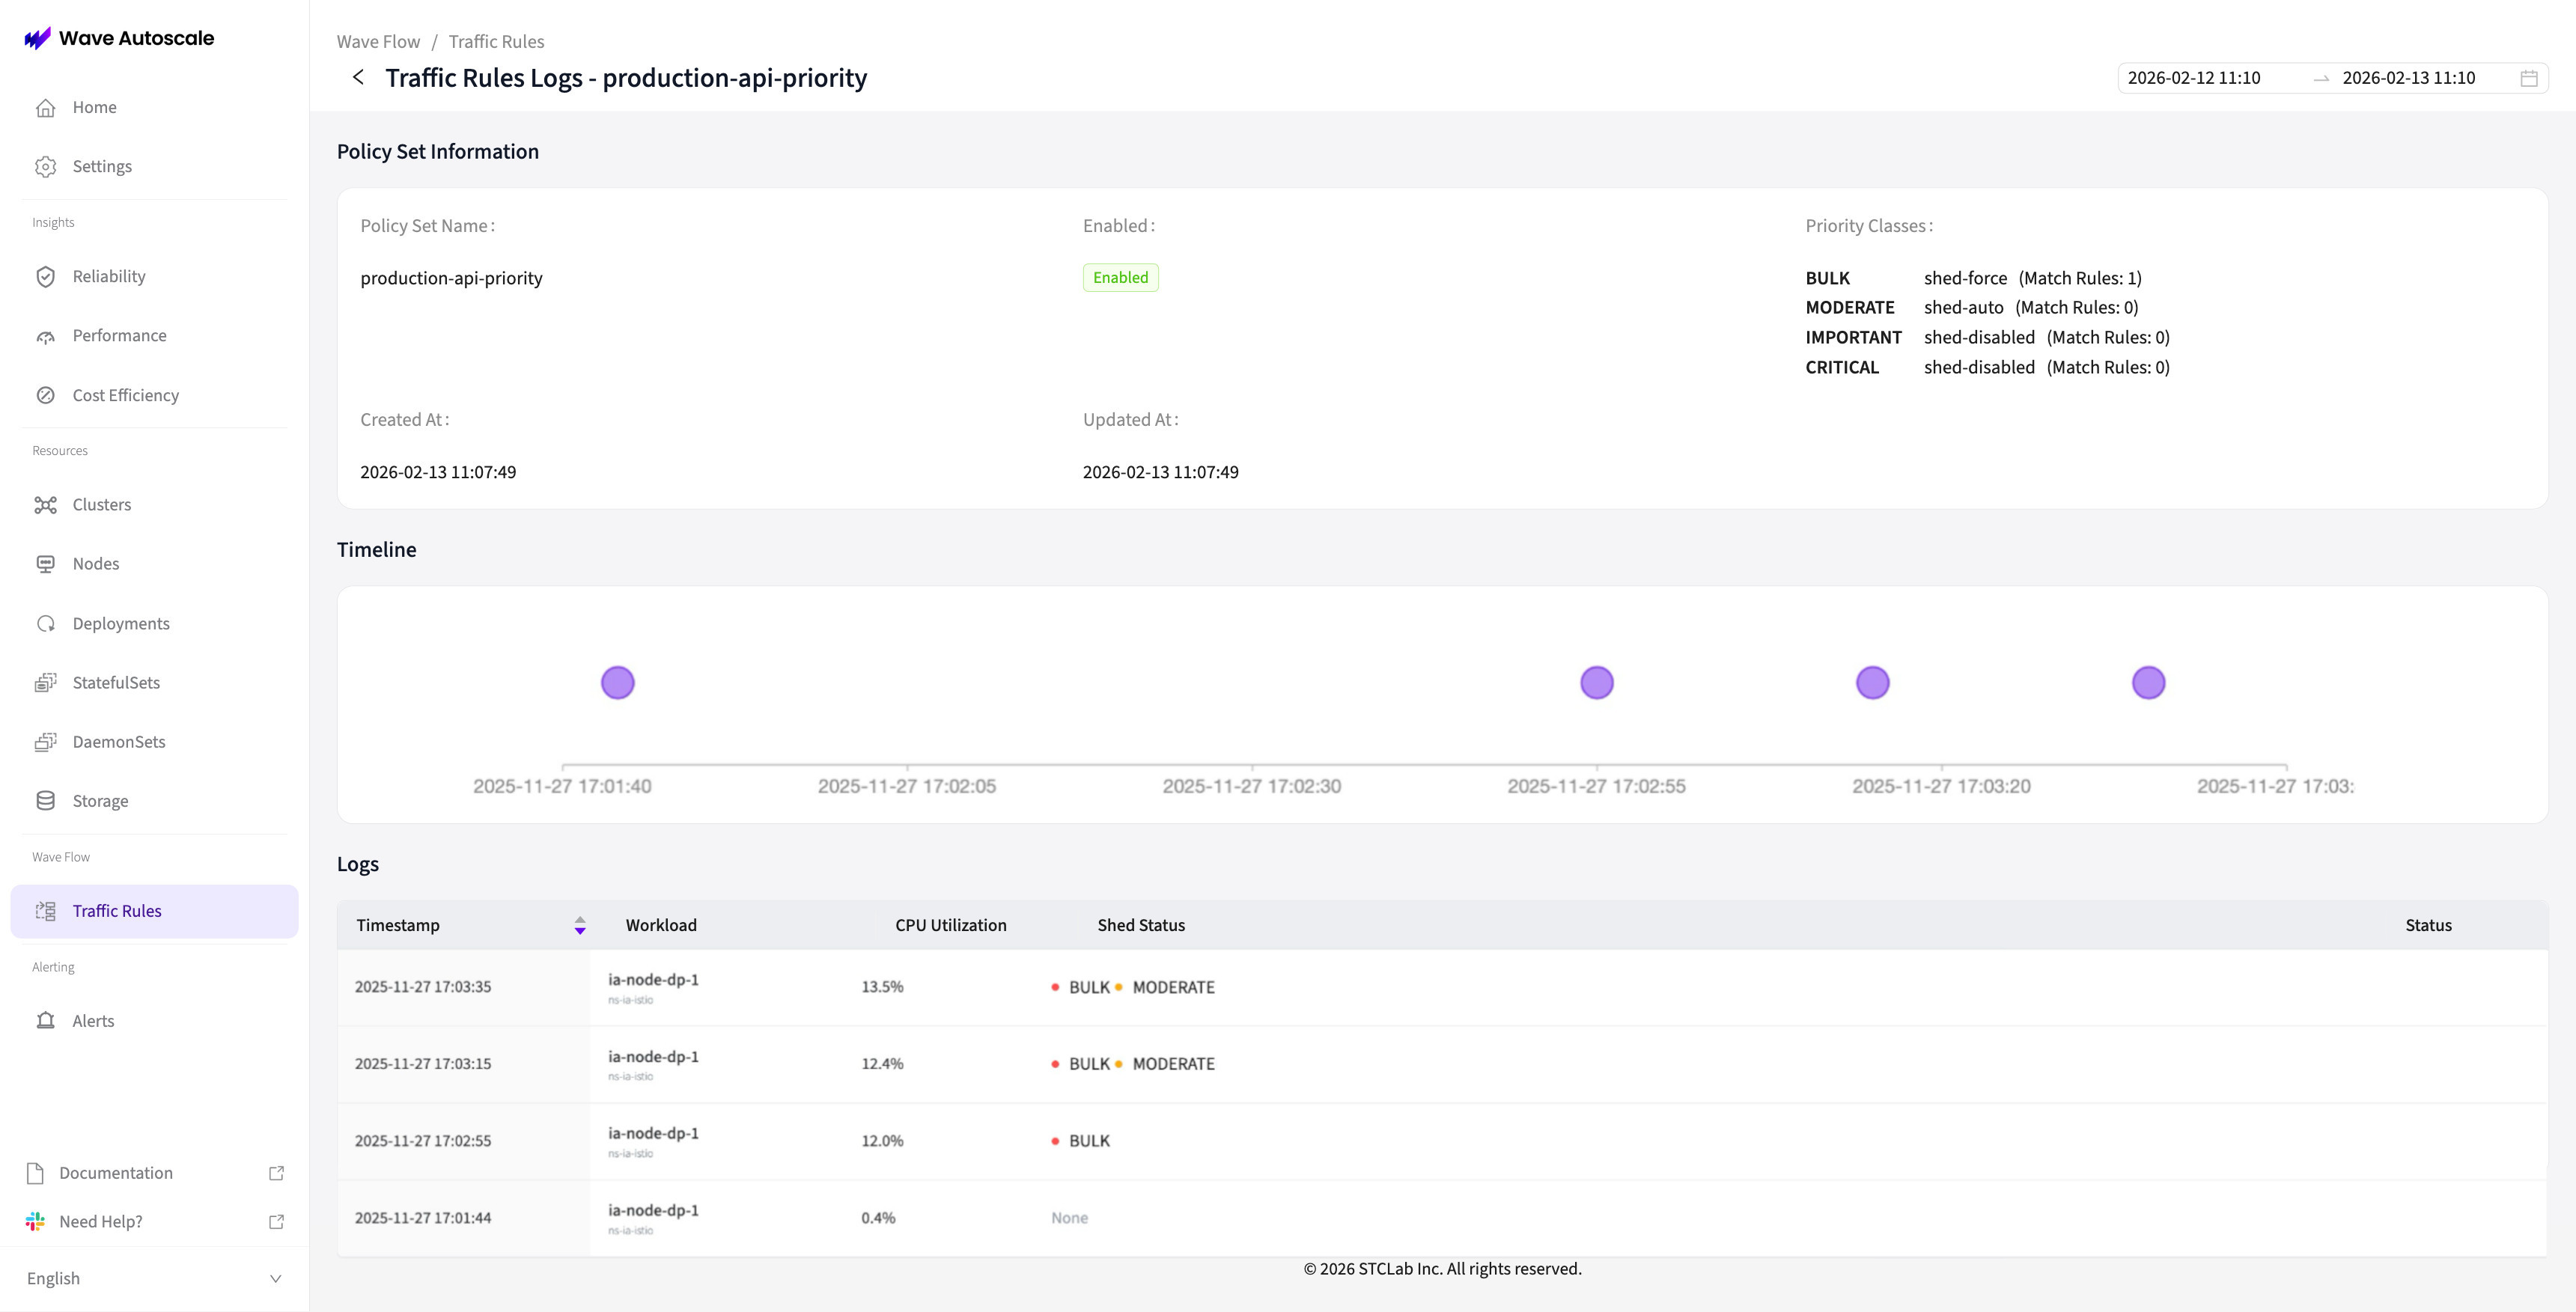
Interpret Logs
The logs table shows shedding events with these columns:
- Timestamp: When the shedding decision was made
- Workload: Which workload (namespace/deployment) the policy is monitoring
- CPU Utilization: Current CPU usage of the workload at that time
- Shed Status: Badges showing which priority classes are currently being shed (BULK, MODERATE, IMPORTANT, CRITICAL)
- Status: Success/Error indicator with reason if applicable
Reading the Shed Status:
- None: No traffic is being shed (normal operation)
- BULK badge: Only BULK priority traffic is being shed
- MODERATE + BULK badges: Both MODERATE and BULK traffic are being shed
- IMPORTANT badge: System under severe load (IMPORTANT traffic being shed)
- CRITICAL badge: Critical failure - should never happen if configured correctly
Healthy Operation:
- Most log entries show "None" or only "BULK" being shed
- CPU utilization remains stable
- No CRITICAL or IMPORTANT shedding
System Under Load:
- Increasing frequency of MODERATE and BULK shedding
- Higher CPU utilization percentages
- IMPORTANT may be shed during extreme peaks (if set to "Auto" strategy)
Step 5: Test Under Load (Optional)
To validate Wave Flow is working correctly, simulate traffic load:
Test in Staging First
Always test load scenarios in a staging environment before production. Shedding real user traffic can impact user experience.
Generate Load
Use a load testing tool to generate traffic:
# Install hey (HTTP load generator)
go install github.com/rakyll/hey@latest

# Generate BULK traffic (recommendations endpoint)
hey -z 60s -c 100 https://your-domain.com/recommendations

# Generate CRITICAL traffic (checkout endpoint)
hey -z 60s -c 50 https://your-domain.com/checkout/submit
Expected Behavior
During the load test:
- CRITICAL requests should receive 100% success rate (HTTP 200)
- BULK requests may receive HTTP 503 (Service Unavailable) responses as they're shed
- Overall system latency should remain stable (shedding prevents overload)
Common Issues and Troubleshooting
WASM Module Not Deployed
Issue: WASM plugin configuration is not created (e.g., EnvoyFilter for Istio, WasmPlugin for other proxies).
Solutions:
- Verify your proxy supports Proxy-WASM (check proxy version and WASM capability)
- Check Wave Agent has permissions to create WASM plugin resources
- Review agent logs:
kubectl logs -n wave-autoscale deployment/wave-autoscale-agent - For Istio: Verify EnvoyFilter exists with
kubectl get envoyfilter -n istio-system
All Traffic Being Shed
Issue: Even CRITICAL traffic is being rejected with HTTP 503.
Solutions:
- Verify CRITICAL class shedding strategy is set to "Disabled"
- Check if targets are correct (policy applied to right ingress/sidecar)
- Ensure policy is enabled (toggle in UI)
- Review match rules — CRITICAL class may not have matching rules defined
No Shedding Under Load
Issue: System is overloaded, but Wave Flow isn't shedding any traffic.
Solutions:
- Verify shedding strategy is set to "Auto" (not "Disabled")
- Check if load is actually reaching the threshold (Wave Flow only sheds when necessary)
- Ensure match rules are correct (traffic may not be matching any priority class)
- Review Envoy metrics to see if WASM module is receiving requests
Next Steps
Now that you have Wave Flow configured:
- Learn Advanced Patterns: Explore Priority-Based Traffic Protection for deeper configuration options
Best Practice: Start Conservative
When first deploying Wave Flow in production:
- Create policy but keep it disabled
- Monitor traffic patterns for 1-2 weeks
- Refine match rules based on actual traffic
- Enable policy during off-peak hours
- Gradually increase coverage to peak traffic times
- Monitor metrics closely for first few days
Questions? For advanced configuration options, see the Priority-Based Traffic Protection guide. For integration with other Wave features, see Integration Patterns.