Container Settings
Each container card on the Smart Sizing tab has a Container Settings button. It opens the per-container modal with two sections: Recommendation bounds and Auto-apply.
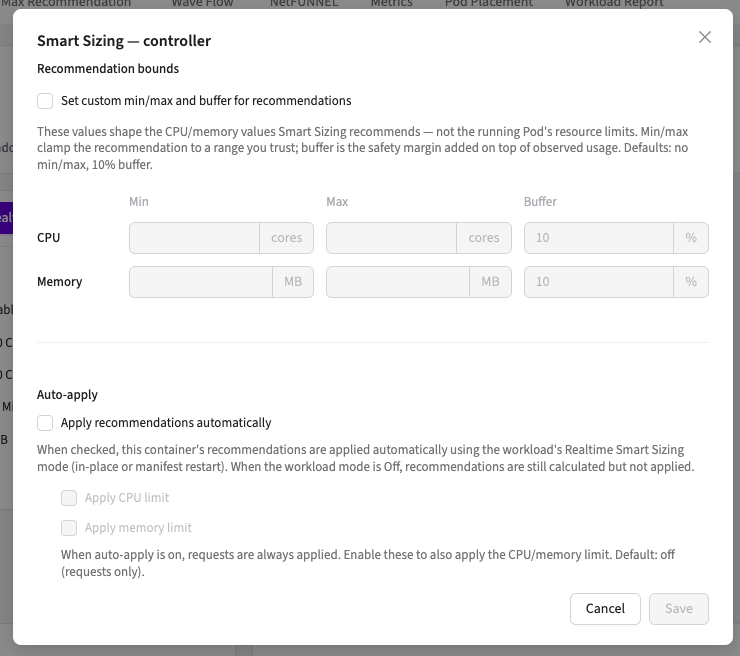
Recommendation bounds
These values shape what Smart Sizing recommends; they never touch the running pod directly.
| Control | Effect | Default |
|---|---|---|
| Min (CPU cores / memory MB) | Floor: the recommendation never goes below this, regardless of how low usage drops | none |
| Max (CPU cores / memory MB) | Ceiling: the recommendation never exceeds this, your hard cost cap | none |
| Buffer (%) | Safety margin added on top of observed usage before min/max clamping | 10% |
Memory bounds are in MiB (the console labels this MB; the value is the same number of MiB).
Enable Set custom min/max and buffer for recommendations to edit them. The pipeline per cycle: observe usage → add buffer → clamp to min/max → check change thresholds → apply (if auto-apply is on).
Why add buffer? Smart Sizing aims for reliable, cost-effective values, but memory can spike in ways the analysis didn't see. A buffer on top of the recommendation absorbs those surprises; raise it for spiky workloads, and set a memory Min for apps that need headroom at startup (JVM warm-up is the classic case).
Typical patterns:
- Critical production service: buffer 20-30%, memory min set to a safe floor.
- Cost-optimized batch / background worker: defaults (10% buffer), optionally a CPU max as a cost cap.
- Workload on Aggressive Recommendations: keep a meaningful buffer and min; the 1-hour window is less forgiving.
Auto-apply
Apply recommendations automatically opts this container into Realtime Resizing. Recommendations are applied each 10-minute cycle using the workload's mode (In-place or Manifest). If the workload mode is Off, recommendations are still calculated but nothing is applied; both switches must be on for automatic resizing.
Two sub-options control whether limits are applied:
| Option | Default |
|---|---|
| Apply CPU limit | off |
| Apply memory limit | off |
When auto-apply is on, requests are always applied. Limits are only applied if you enable these explicitly.
The memory limit is applied only in Manifest mode. In-Place mode applies memory requests only, because the Kubernetes in-place resize path does not change memory limits, so with In-Place selected the Apply memory limit option has no effect.
Why limits default to off. Lowering a memory limit automatically is the riskiest sizing action: an unexpected spike against a freshly lowered limit means an OOMKill. Excluding limits from auto-apply keeps the cost benefit (requests drive scheduling and billing) while leaving the safety ceiling where you set it.
Guardrails that always apply
Whatever the settings, recommendations are sanity-checked before any apply:
- limit ≥ request is always enforced.
- CPU recommendations never go below 0.1 core, or 0.01 core when Aggressive Recommendations is on.
- Memory recommendations never go below 12 MiB, the container runtime's minimum.
- Zero or absent values are never applied.
- Floor-pinned recommendations are withheld (Wave 3.4.2+). If a container's request is already below the floor — common on OpenShift, where the default request can be a few millicores — clamping the recommendation up to the floor would raise the request and inflate the savings report with a change nobody asked for. Wave now drops such a recommendation instead, unless it still lowers the current request. The container shows a recommendation withheld tag on the Smart Sizing tab, with a tooltip explaining why.
A withheld recommendation is not the same as no data. Before 3.4.2 both looked identical in the console, which made a floor-clamped container indistinguishable from one that simply had not collected enough metrics. The withheld tag now separates the two.
Workload-level settings
The Settings button on the Info card (next to Realtime Resizing) holds workload-wide options, currently the Aggressive Recommendations toggle.