Autopilot Scheduler
Autopilot Scheduler allows you to apply different Autopilot configurations (called Autopilot Presets) at specific times using cron expressions. Use it for predictable traffic patterns like business hours, promotional events, or maintenance windows.
Overview
While Autopilot's ML handles dynamic scaling, Scheduler lets you:
- Switch between different Autopilot Presets at scheduled times
- Prepare for known traffic events (sales, launches, campaigns)
- Optimize costs during off-peak hours
- Apply different strategies for weekdays vs weekends
Example: Run "Optimize for Performance" preset during business hours, switch to "Optimize for Cost" preset overnight.
Accessing the Scheduler
- Navigate to Deployments from the sidebar
- Click the Schedules tab at the top of the page
- The page displays:
- Left side: Monthly calendar showing all scheduled events
- Right side: List of schedules and available Autopilot Presets
Key Concepts
Schedules
Time-based rules that activate Autopilot Presets at specific times:
- Cron expressions: Define when the schedule activates (minute, hour, day, month, day of week, year)
- Duration: How long (in minutes) the preset remains active
- Pre-execution: Optional advance activation before the cron time (in minutes)
- Multiple Presets: Each schedule can apply different presets to different deployments
Example: A schedule might apply "Performance" preset to api-server and "Cost" preset to worker deployments, both running Monday-Friday 9am-5pm.
Autopilot Presets
Reusable Autopilot configurations that can be assigned to schedules:
- Created separately from schedules in the Autopilot Presets card
- Contains all Autopilot settings (strategy, thresholds, min/max replicas, etc.)
- One preset can be used by multiple schedules
- Each preset needs a descriptive title (e.g., "Business Hours Performance", "Weekend Cost Mode")
How They Work Together
- Create Autopilot Presets with different configurations
- Create a Schedule with a cron expression
- In the schedule, add presets and select which deployments each preset applies to
- When the cron time arrives, Wave applies the presets to their assigned deployments
- After the duration ends, deployments return to their default configuration
Creating Your First Schedule
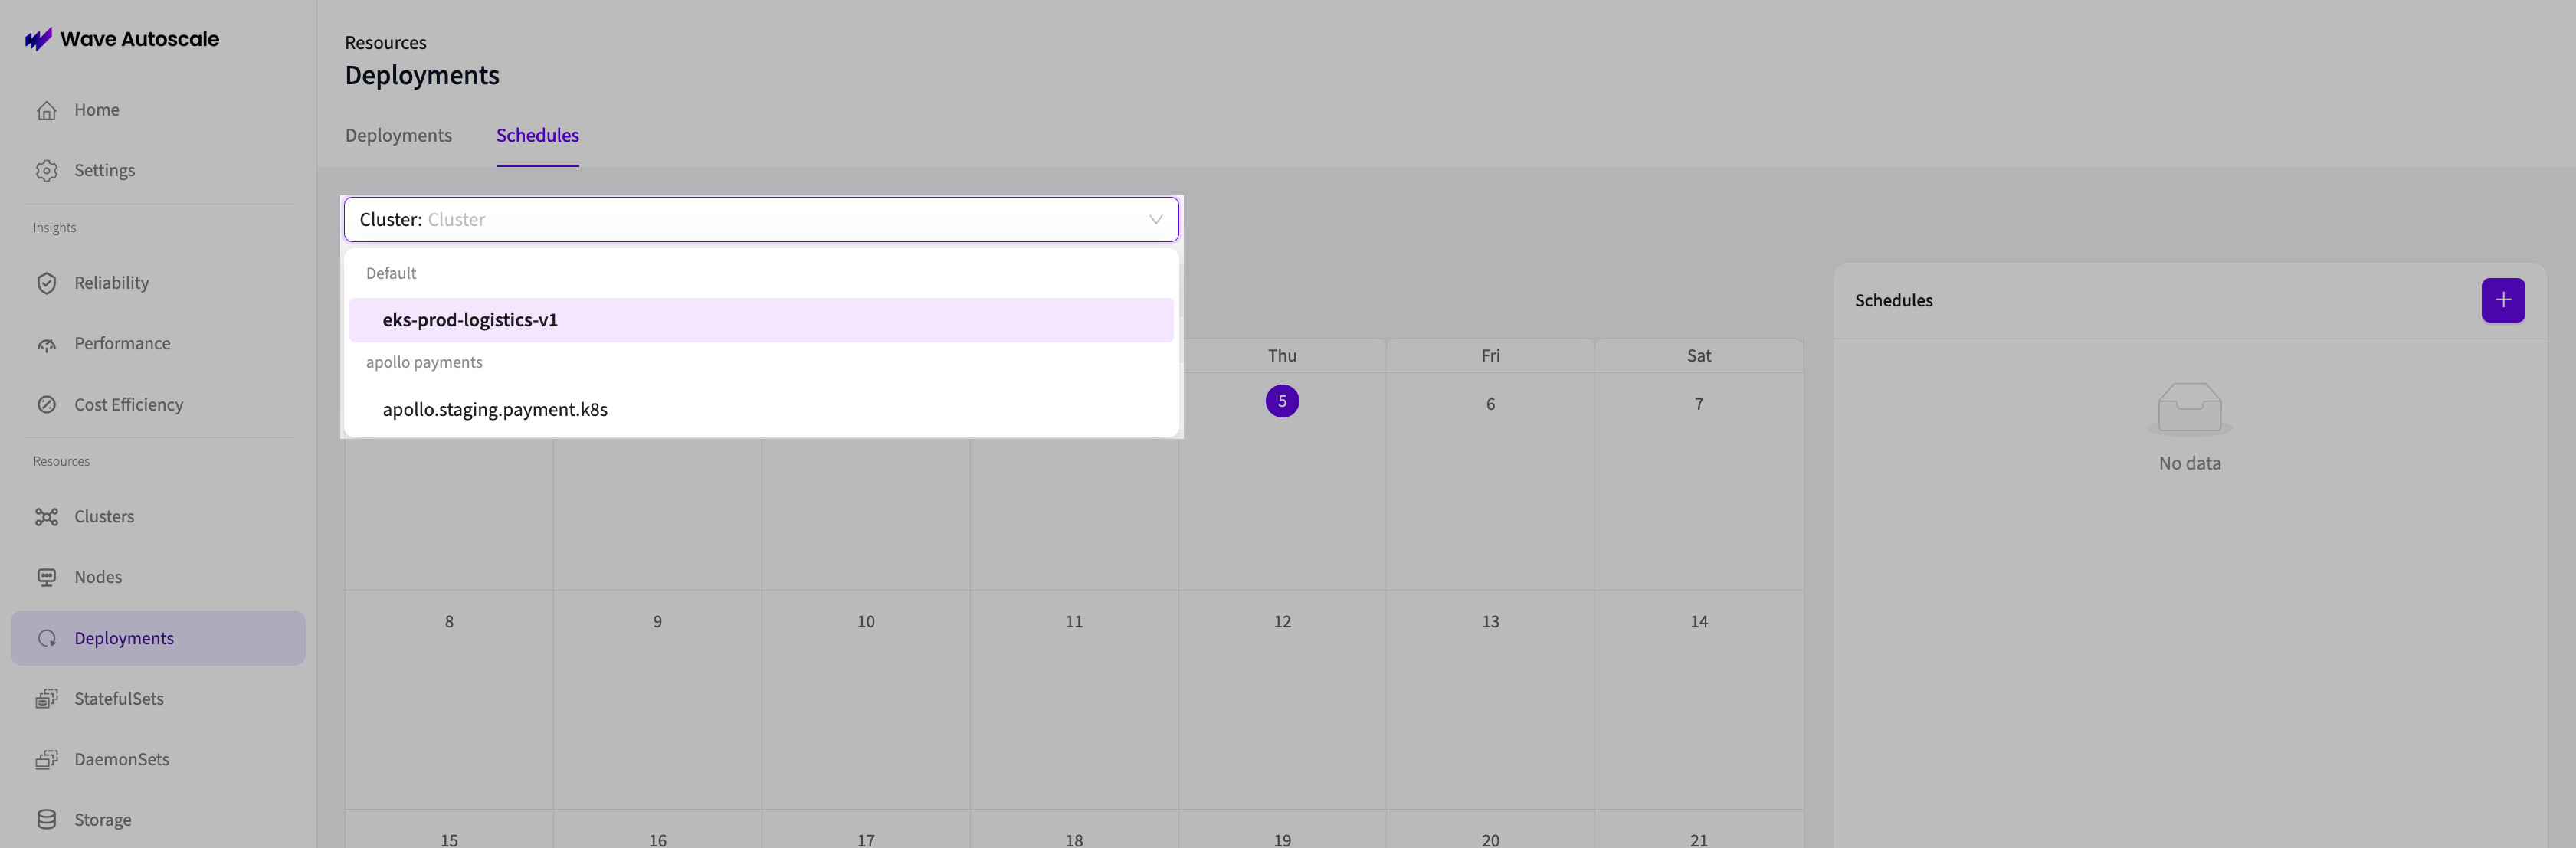
Step 1: Select Cluster
At the top of the Schedules tab, select which cluster you want to schedule for using the Cluster Selector dropdown.
Step 2: Create Autopilot Presets (if needed)
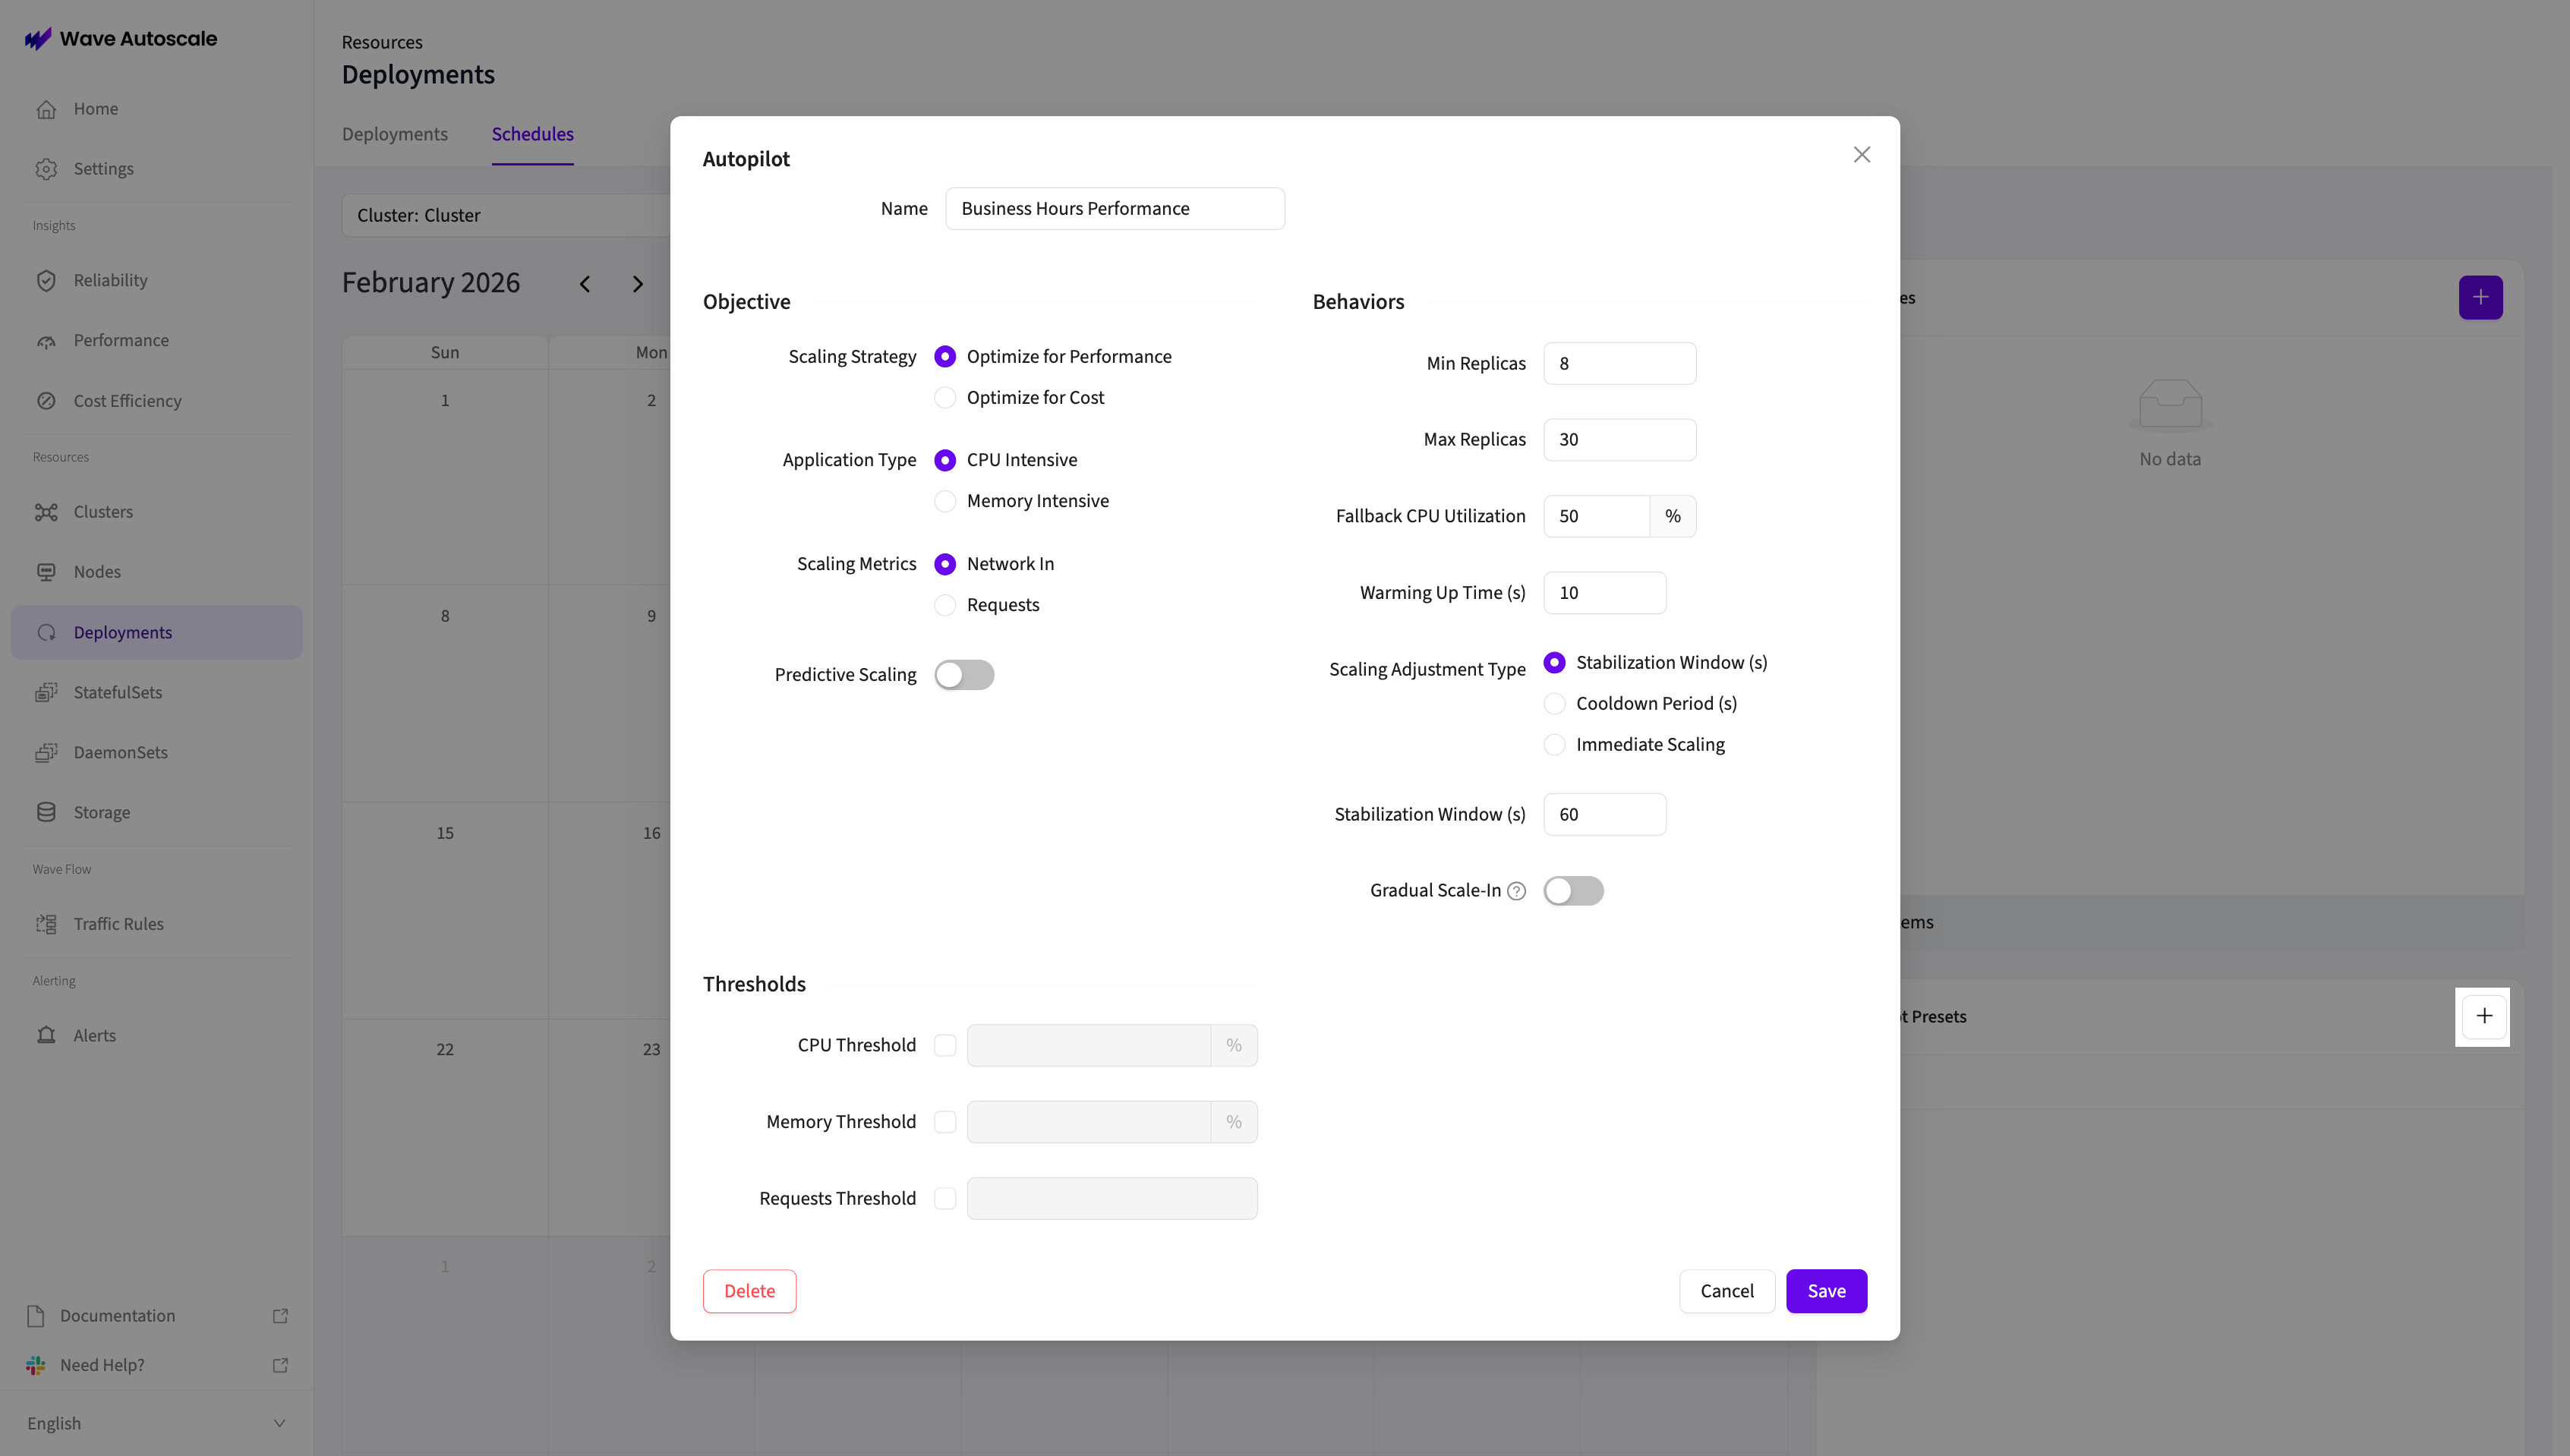
Before creating a schedule, you need Autopilot Presets. In the Autopilot Presets card on the right:
- Click the "+" button in the card header
- A modal opens with all Autopilot configuration options:
- Title: Give it a descriptive name
- Strategy: Performance or Cost
- Application Type: CPU Intensive or Memory Intensive
- Thresholds: CPU%, Memory%, Network, Request metrics
- Min/Max Replicas: Scaling boundaries
- Cooldown Periods: Stabilization times
- And more (see Core Configuration for details)
- Click Save
Create multiple presets for different scenarios (e.g., "Business Hours", "Off Hours", "Flash Sale").
Step 3: Create the Schedule
In the Schedules card on the right:
- Click the "+" button in the card header
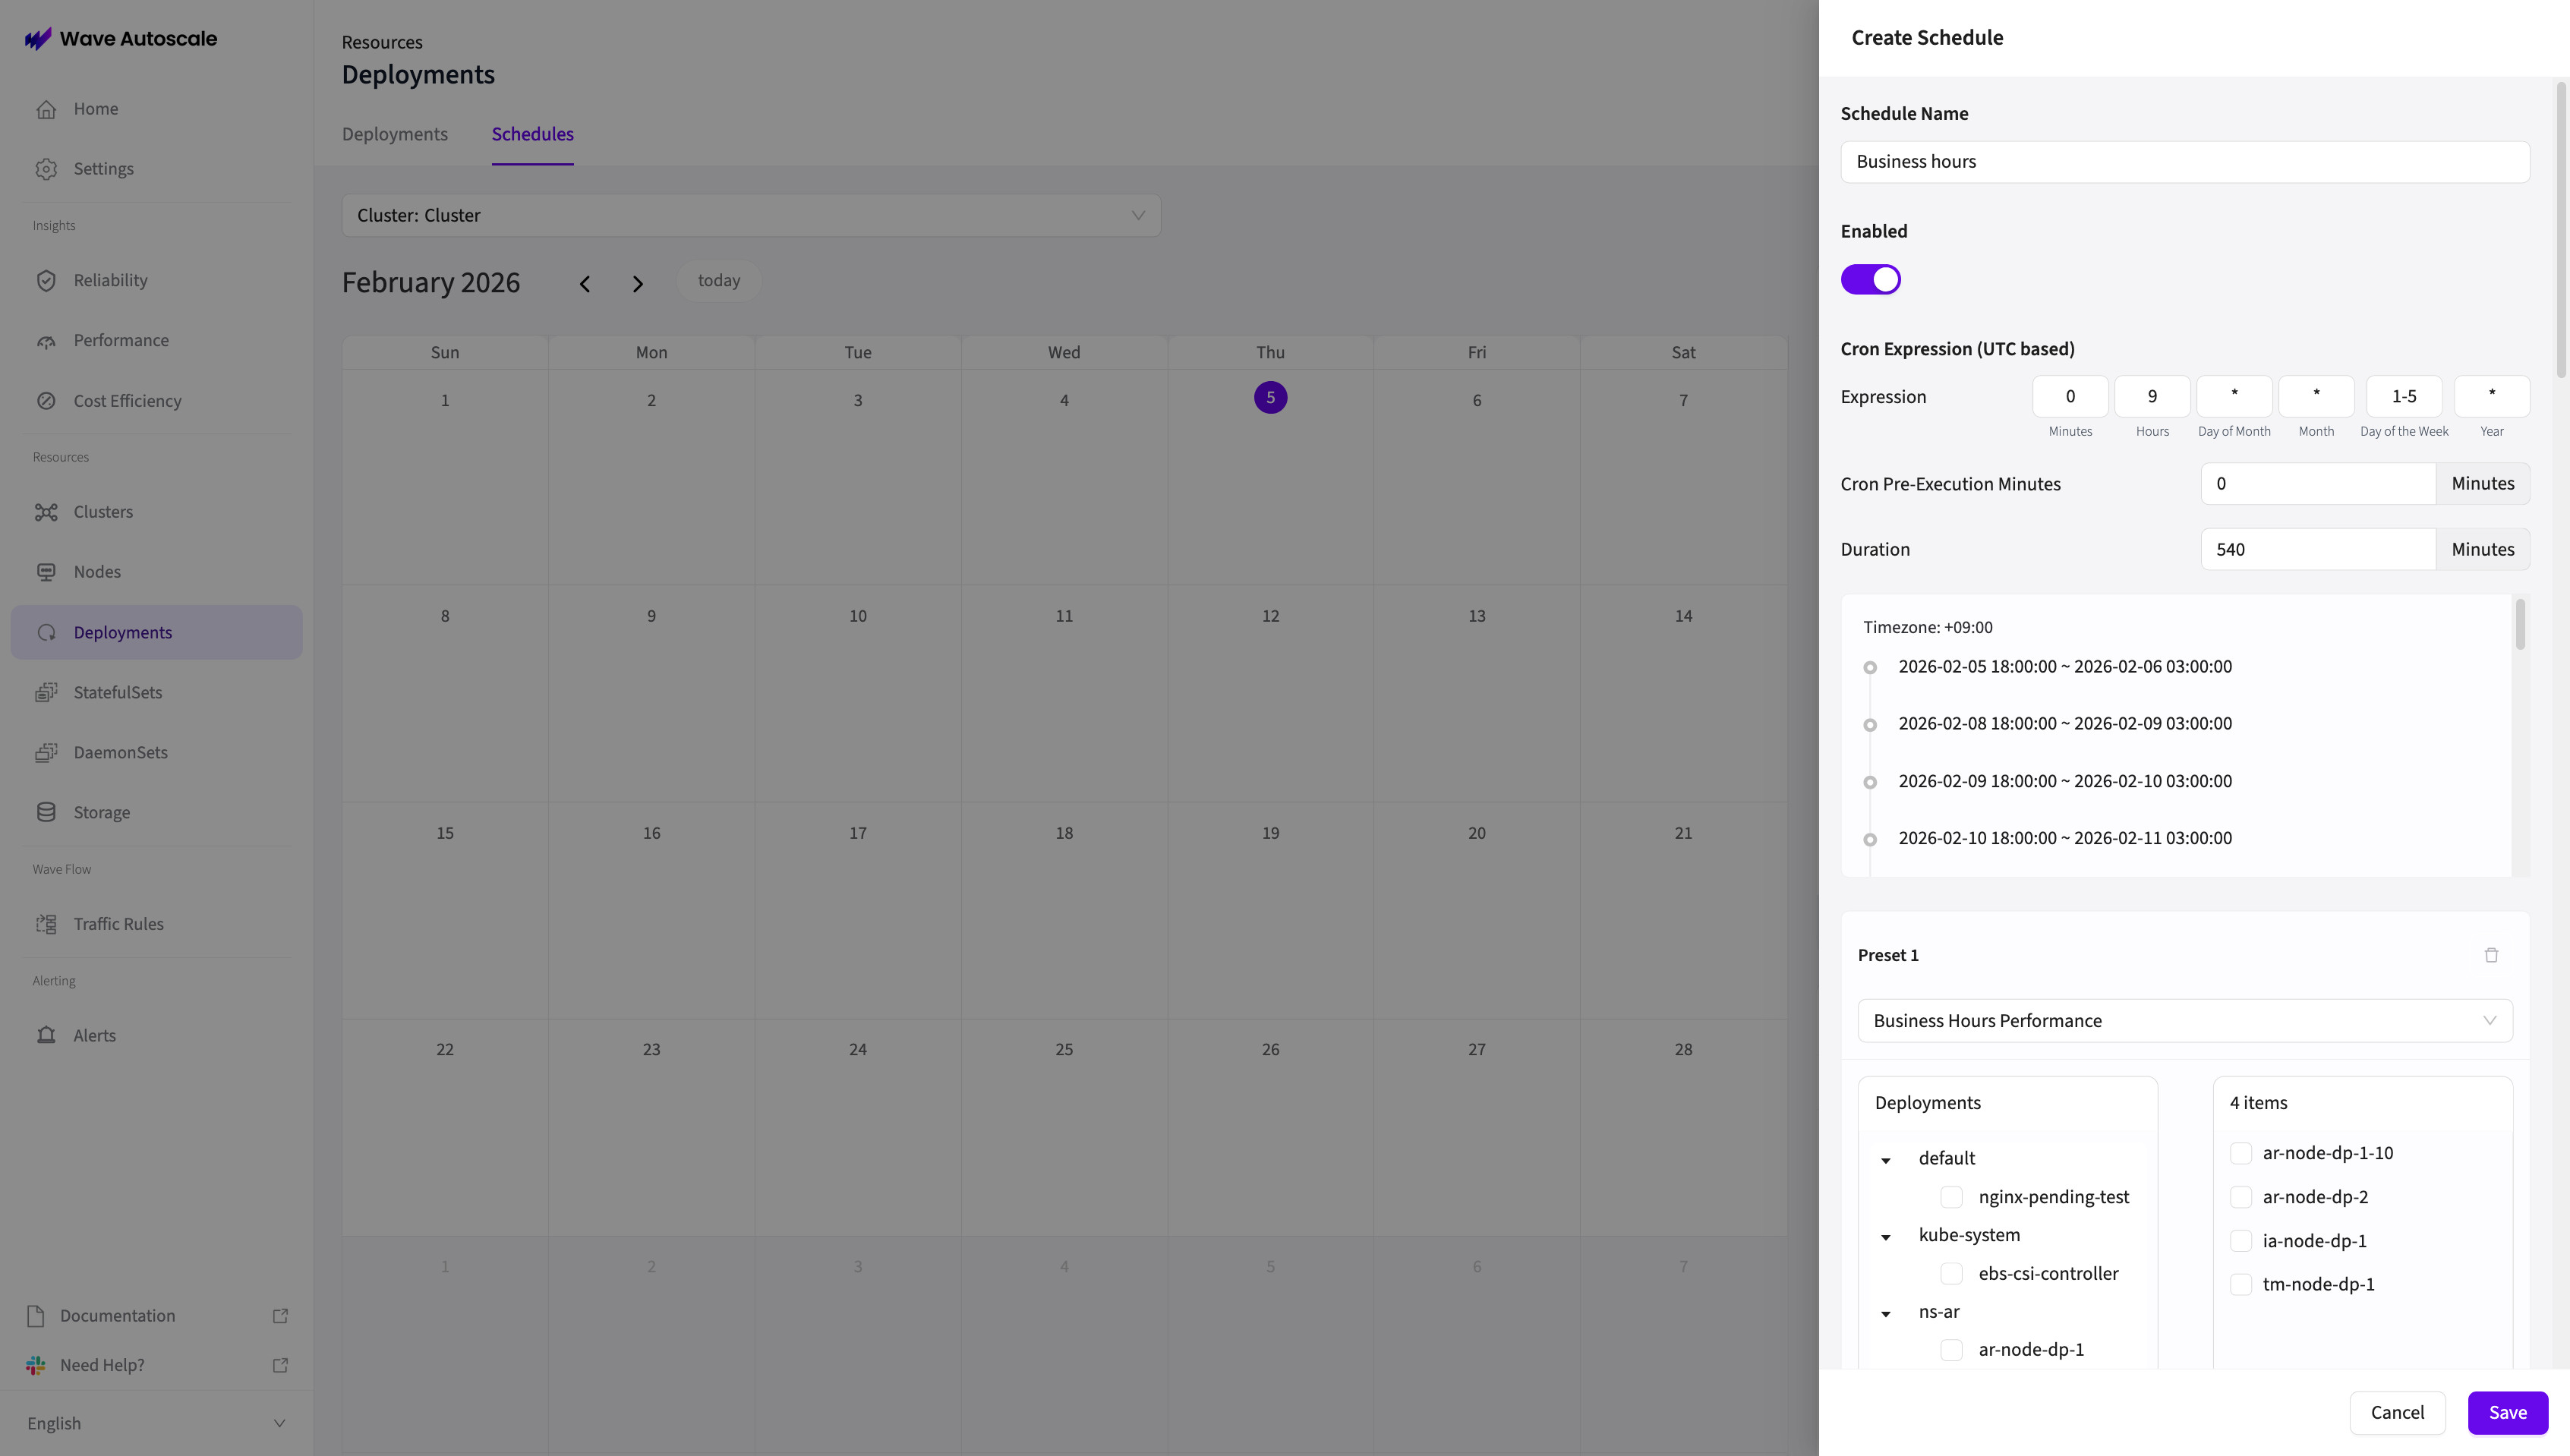
- A drawer opens on the right side with the schedule form
Basic Information
- Schedule Name: Descriptive name (e.g., "Weekday Business Hours")
- Enabled: Toggle to activate/deactivate the schedule (defaults to enabled)
Cron Expression
Define when the schedule activates using 6 separate fields:
| Field | Values | Description | Example |
|---|---|---|---|
| Minutes | 0-59 | Minute of the hour | 0 (top of hour) |
| Hours | 0-23 | Hour of the day (24-hour UTC) | 9 (9 AM UTC) |
| Day of Month | 1-31 or * | Day of the month | * (every day) |
| Month | 1-12 or * | Month of the year | * (every month) |
| Day of Week | 1-7 or * | Day of week (1=Sunday) | 2-6 (Mon-Fri) |
| Year | 4-digit or * | Specific year | * (every year) |
Common Patterns (Korea Time → UTC):
- Every weekday at 9 AM KST:
0 0 * * 2-6 *(midnight UTC) - Every day at midnight KST:
0 15 * * * *(3 PM UTC previous day) - First day of month at 2 AM KST:
0 17 1 * * *(5 PM UTC previous day) - Sundays at 3 AM KST:
0 18 * * 7 *(6 PM UTC Saturday)
No asterisks in Minutes field: The Minutes field must be a specific value (0-59), not *. This prevents schedules from running every minute.
Timezone Considerations: Cron expressions are evaluated in UTC timezone. If you're in a different timezone, you need to convert your desired local time to UTC.
For Korea (UTC+9):
- Subtract 9 hours from Korea time to get UTC
- Example: 9:00 AM KST → 0:00 AM (midnight) UTC → Set hour to
0 - Example: 6:00 PM KST → 9:00 AM UTC → Set hour to
9 - Example: 2:00 AM KST → 5:00 PM UTC (previous day) → Set hour to
17
Important: Times before 9:00 AM KST will map to the previous day in UTC. Adjust the day-of-week field accordingly.
Always check the Future Executions timeline below the cron fields - it will show you the scheduled times in your browser's timezone to confirm the schedule is correct.
Timing Configuration
- Cron Pre-execution Minutes: Start the preset this many minutes before the cron time (optional, defaults to 0)
- Example: With cron at 9:00 AM and pre-execution of 15, preset activates at 8:45 AM
- Duration (minutes): How long the preset stays active (required, minimum 1)
- Example: Duration of 480 = 8 hours
The active window is pre-execution + duration, measured from the pre-execution start. With a 9:00 AM cron, 15 minutes of pre-execution, and a 480-minute duration, the preset is active from 8:45 AM to 4:45 PM — a total of 495 minutes.
Fixed in Wave 3.4.1. Earlier versions measured the window end from the cron time rather than from the pre-execution start, so the preset stayed active for pre-execution + duration in the preview but only duration at runtime — workloads returned to their default configuration exactly the pre-execution minutes early. The same fix also covers two edge cases that previously produced no activation at all: a pre-execution longer than the gap between cron occurrences, and a schedule evaluated exactly on the occurrence second.
Add Autopilot Presets
Now assign presets to deployments:
- Click "+ Add Autopilot Preset"
- A preset card appears with:
- Config dropdown: Select which Autopilot Preset to use
- Deployment selector: Tree-based transfer component showing:
- Left panel: Tree of namespaces → deployments
- Right panel: Selected deployments
- Select deployments from the tree and move them to the right panel
- Repeat to add more presets if you want different configurations for different deployments
Validation Rules:
- Each preset must use a different Autopilot Preset config (no duplicates)
- Each deployment can only be assigned to one preset within a schedule
- If you try to add the same deployment twice, you'll see an error
Step 4: Save and Review
- Click Save in the bottom right
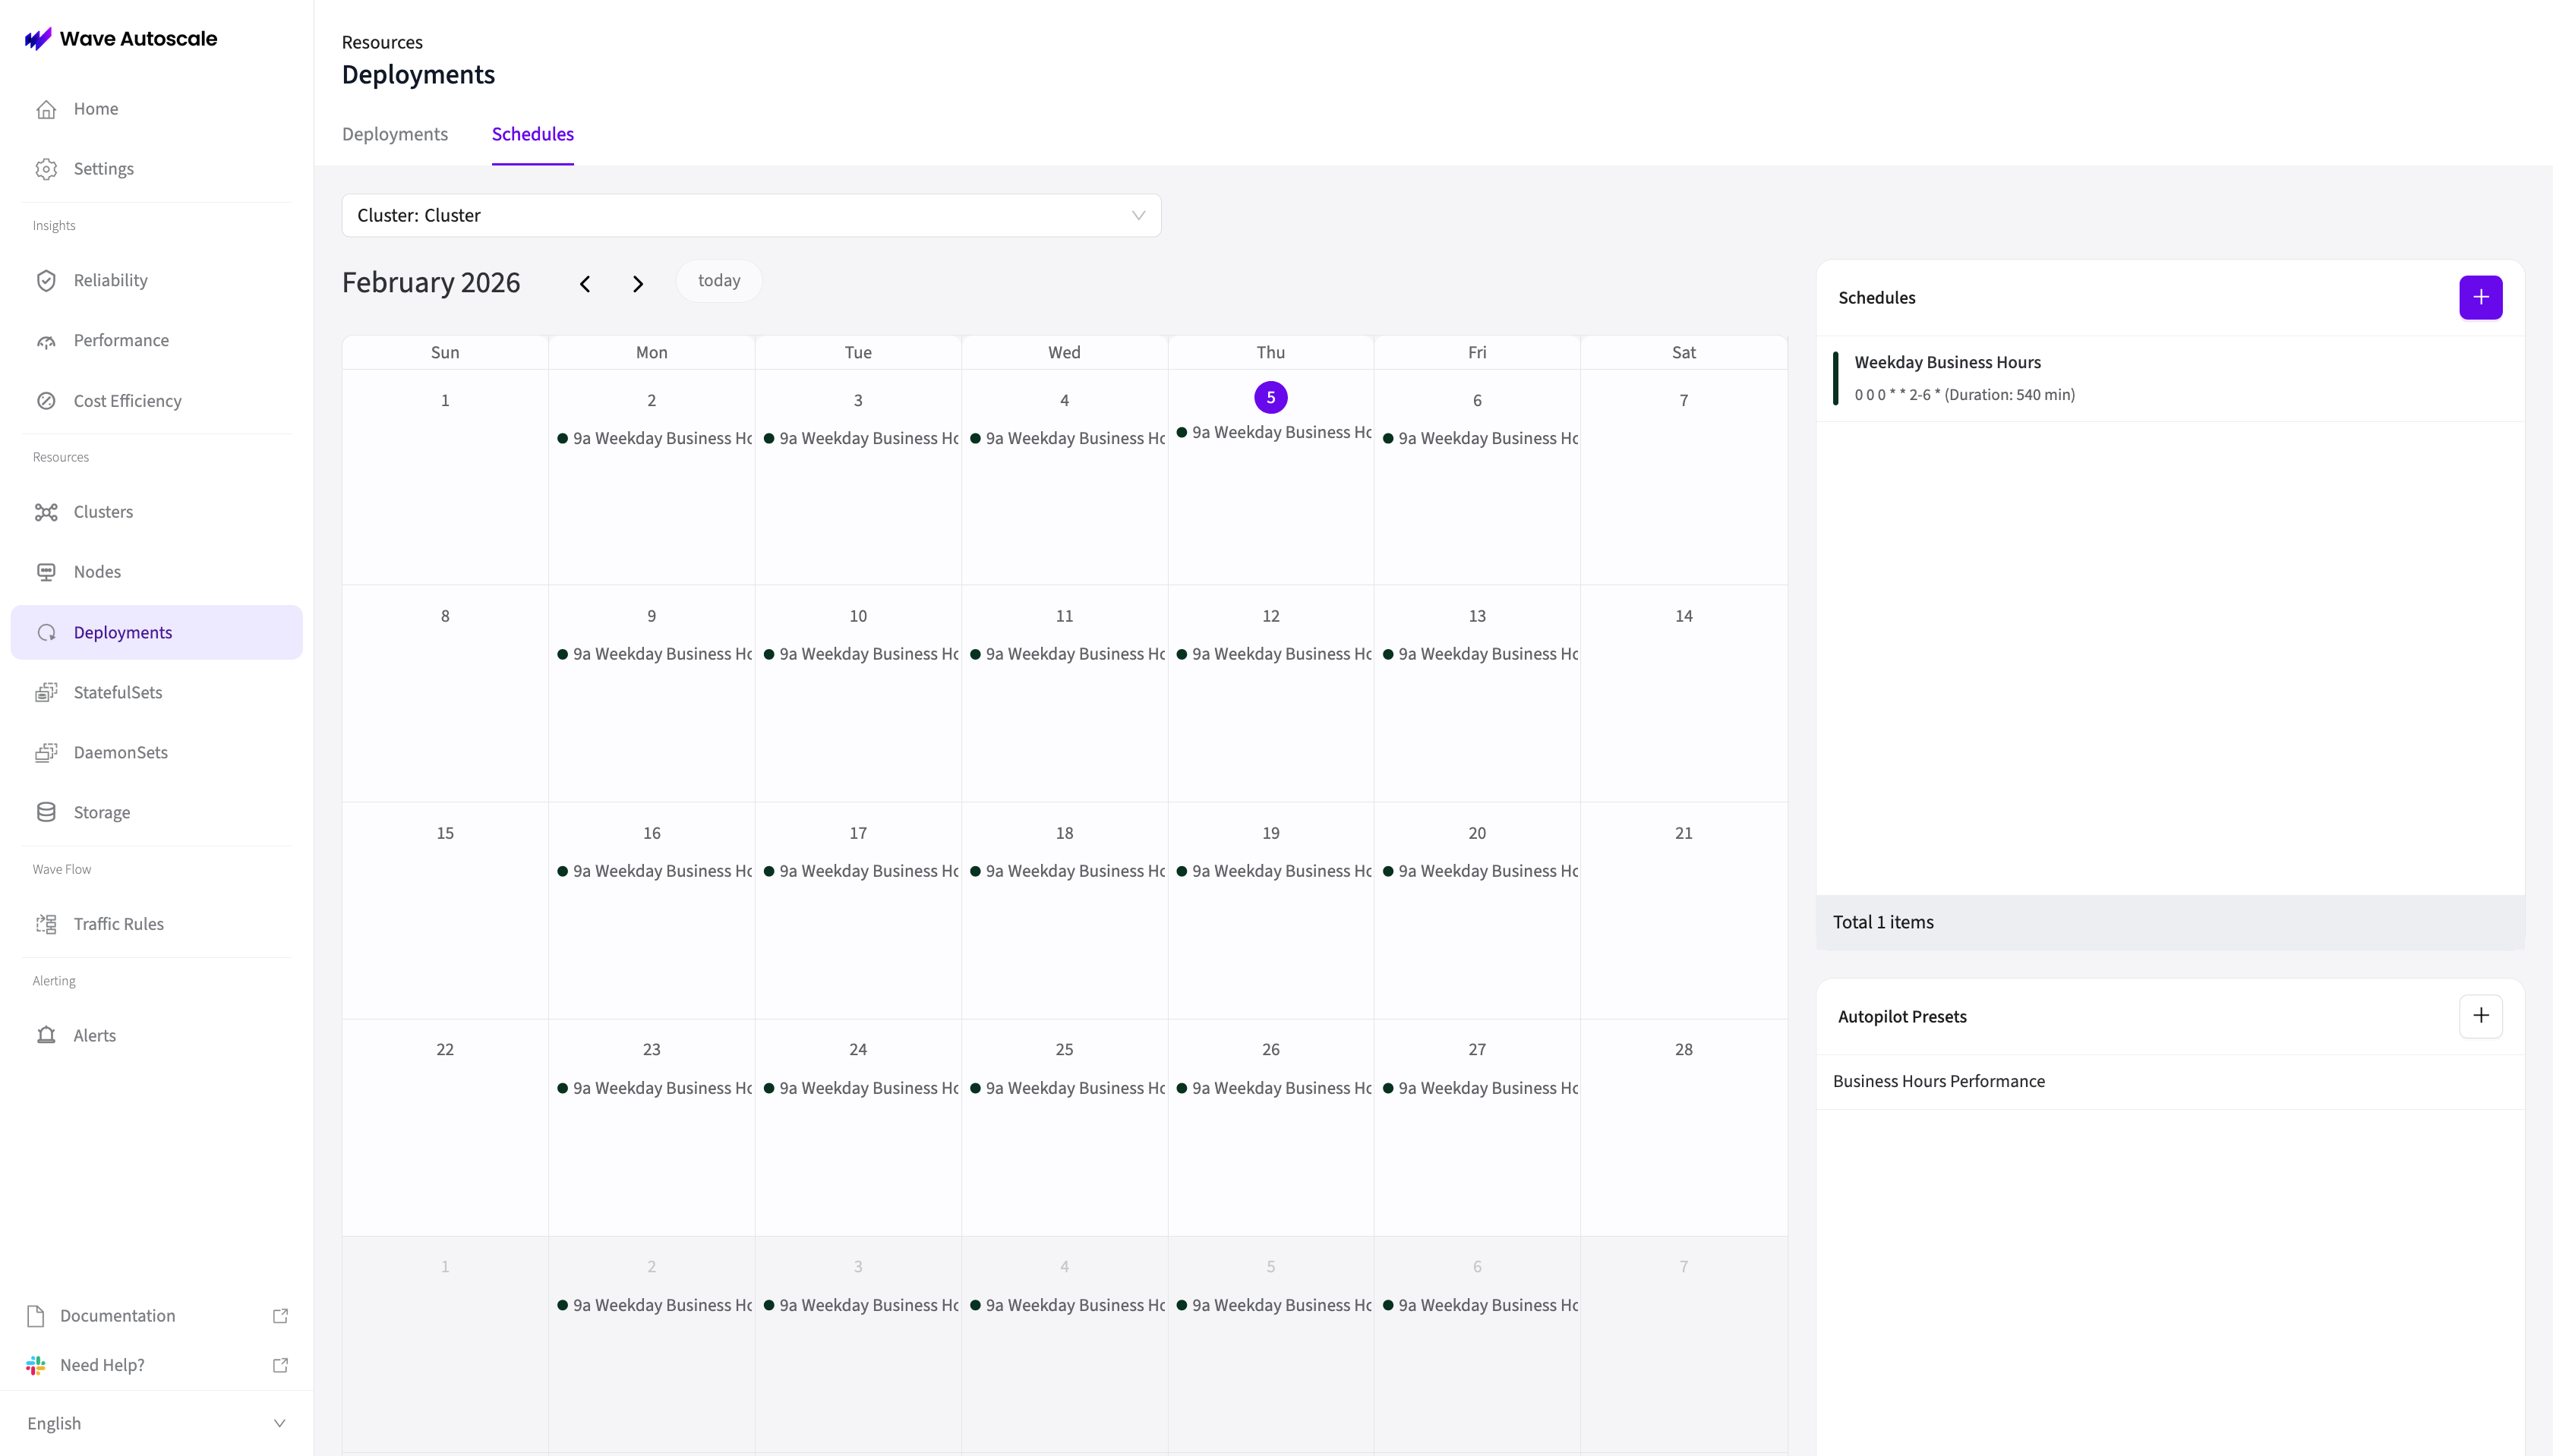
- Your schedule appears in the Schedules list with:
- A colored left border (unique color per schedule)
- Schedule title
- Description showing the cron expression and duration
- The schedule also appears on the calendar on the left side, showing when it will run
Understanding the Schedules Tab
Calendar View (Left Side)
The monthly calendar displays scheduled events:
- Colored dots: Each schedule has a unique color (generated from its ID)
- Event dates: Shows when each schedule will execute based on its cron expression
- Navigation: Use arrows to view different months
- Filtering: Calendar automatically filters to show only the visible date range
Schedules List (Right Side, Top Card)
All schedules for the selected cluster:
- Colored border: Visual indicator matching calendar events
- Title: Schedule name
- Description: Cron expression and duration summary
- Status: Disabled schedules appear with reduced opacity (30%)
- Count: Footer shows total number of schedules
- Click to edit: Click any schedule to open it in the drawer
Autopilot Presets List (Right Side, Bottom Card)
All available Autopilot Presets:
- List of preset configurations
- Click to edit the preset settings
- These presets can be assigned to schedules
Common Scheduling Patterns
Pattern 1: Business Hours vs Off-Hours
Use case: B2B SaaS with weekday traffic
Step 1 - Create Presets:
Create three Autopilot Presets:
- "Business Hours Performance"
- Strategy: Optimize for Performance
- Min Replicas: 8, Max Replicas: 30
- "Off Hours Cost Savings"
- Strategy: Optimize for Cost
- Min Replicas: 2, Max Replicas: 10
- "Weekend Mode"
- Strategy: Optimize for Cost
- Min Replicas: 1, Max Replicas: 8
Step 2 - Create Schedules:
Schedule 1: "Weekday Business Hours"
Cron: 0 0 * * 2-6 *  (9 AM KST Monday-Friday = midnight UTC)
Duration: 540 minutes (9 hours, ends at 6 PM KST)
Preset: "Business Hours Performance" → api-server, web-app
Schedule 2: "Weekday Nights"
Cron: 0 9 * * 2-6 *  (6 PM KST Monday-Friday = 9 AM UTC)
Duration: 900 minutes (15 hours, ends at 9 AM KST next day)
Preset: "Off Hours Cost Savings" → api-server, web-app
Schedule 3: "Weekends"
Cron: 0 15 * * 6,7 *  (Midnight KST Sat & Sun = 3 PM UTC Fri & Sat)
Duration: 1440 minutes (24 hours)
Preset: "Weekend Mode" → api-server, web-app
Pattern 2: Flash Sale Event
Use case: E-commerce promotional sale
Preset: "Black Friday Sale"
- Strategy: Optimize for Performance
- Min Replicas: 25, Max Replicas: 100
- Predictive Scaling: Enabled
Schedule: "Black Friday 2025"
Cron: 0 23 27 11 * 2025  (Nov 28, 2025 8 AM KST = Nov 27 11 PM UTC)
Pre-execution: 30 minutes  (starts at 7:30 AM KST)
Duration: 720 minutes (12 hours, ends at 8 PM KST)
Preset: "Black Friday Sale" → checkout-service, product-api, payment-service
Why this works:
- Pre-execution starts scaling 30 minutes early
- High capacity maintained throughout sale hours
- Specific date in 2025 makes it a one-time event
Pattern 3: Weekly Maintenance Window
Use case: Scheduled maintenance every Sunday morning
Preset: "Maintenance Mode"
- Strategy: Optimize for Performance
- Min Replicas: 10, Max Replicas: 10 (frozen)
- Gradual Scaling: 300s (very conservative)
Schedule: "Sunday Maintenance"
Cron: 0 17 * * 7 *  (2 AM KST Sunday = 5 PM UTC Saturday)
Duration: 120 minutes (2 hours)
Preset: "Maintenance Mode" → backend-apiWhy: Maintains stable replica count (10) during deployments, no scaling up or down.
Pattern 4: Multi-Service Tiered Scaling
Use case: Different services need different configurations during peak hours
Presets:
- "Peak Performance" - Min: 20, Max: 80
- "Peak Moderate" - Min: 10, Max: 40
- "Peak Light" - Min: 5, Max: 20
Schedule: "Weekday Peak Hours"
Cron: 0 1 * * 2-6 *  (10 AM KST weekdays = 1 AM UTC)
Duration: 420 minutes (7 hours, ends at 5 PM KST)

Preset Mappings:
- "Peak Performance" → checkout-api, payment-service (critical services)
- "Peak Moderate" → product-api, user-service (medium load)
- "Peak Light" → analytics-worker, email-service (background jobs)Why: Single schedule applies different configurations to different service tiers.
How Schedules Work
Execution Flow
- Cron Trigger: When the cron expression matches the current time
- Pre-execution (if set): Activates earlier than cron time
- Preset Application: Each preset is applied to its assigned deployments
- Active Duration: Presets remain active for the configured minutes
- Return to Default: After duration ends, deployments use their default configuration
Calendar Display
The calendar shows all future execution dates calculated from the cron expression:
- Dynamically generated based on the cron
- Shows approximately the next 10-20 executions
- Updates automatically when you change the visible month
- Colored dots match the schedule's unique color
Cron Expression Tips
Common Cron Patterns (Korea Time → UTC):
Every weekday 9 AM KST:    0 0 * * 2-6 *     (midnight UTC)
Every day midnight KST:    0 15 * * * *      (3 PM UTC prev day)
Monday mornings 8 AM KST:  0 23 * * 1 *      (11 PM UTC Sunday)
First of month 2 AM KST:   0 17 1 * * *      (5 PM UTC prev day)
Every 6 hours from 0 KST:  0 15,21,3,9 * * * * (6-hour intervals in UTC)
Weekend mornings 10 AM KST: 0 1 * * 1,7 *    (1 AM UTC Sat & Sun)
Specific date/time: 0 5 25 12 * 2025 (Dec 25, 2025 2 PM KST = 5 AM UTC)Testing: Always check the "Future Executions" timeline to confirm your cron does what you expect!
Troubleshooting
Schedule Not Activating?
- Schedule is enabled (toggle is on)
- Cron expression is valid (check Future Executions timeline)
- Correct cluster selected in dropdown
- Deployments properly selected in preset mapping
- No typos in deployment/namespace names
Invalid Cron Expression?
- Minutes must be 0-59 (not
*) - Day of week must be 1-7 (1=Sunday)
- All 6 fields required
- Values within valid ranges
Wrong Configuration Applied?
- Check for overlapping schedules (calendar view)
- Verify correct preset selected
- Check deployment selections in TreeTransfer
- Ensure duration is long enough
Preset Not Available?
- Each preset can only be used once per schedule
- Preset might have been deleted
Calendar Empty?
- Verify correct cluster selected
- Check if schedules are in future months
- Ensure schedules are enabled
Related Documentation
- Getting Started: Basic Autopilot setup and default configuration
- Core Configuration: All settings available in Autopilot Presets
- Predictive Scaling: Combine with schedules for optimal results
- Timing Controls: Configure transitions between scheduled configs